How to Install MEPIS-Linux to Disk
|
! Note !
A few more notes may be added,
if/when I re-visit this page again.
In any case, you can use WEB SEARCH links below
to find current information on disk paritioning
for Linux installs.
Links to sections of this page below:
Start-Install-to-Disk
Start-Disk-Partitioning (with QtParted)
Copy-Files-To-Disk
Specify-Dual-Boot
Set-User-Account (& root password)
Set-Computer-Name
Set-Locale-and-Time
Set-Startup-Services
Searches for More Partitioning Info
Bottom of Page
|
Quick Introduction: The text and screenshot images below are intended to preserve a page that is/was at http://blogs.pcworld.co.nz/ pcworld/ tux-love/ 2006/ 06/ beginning_linux_part_iv_1.html That page described the installation of SimplyMEPIS Linux, after trying it out on a 'Live CD'. In particular, this page is intended to show the screenshot images that show how 'QtParted' was used to partition the disk drive. Let the preservation begin:
Start of Install-to-Disk: We assume that you have tried a SimplyMEPIS Live CD and like what you see. We assume: You tried it on a desktop or laptop with a connection to the Internet. You can browse the internet just fine with Firefox (or Konquerer). You can play audio streams from around the world with amaroK. You can play mp3 files with Kplayer or Kaffeine. You have fired up OpenOffice to see the windows for Writer, Calc, and Impress. You have looked over the 'Kmenu' to see some other applications and utilities that are available. Handy though it may be, you can't completely judge an operating system by running it from a 'live CD'. File access times are diabolical compared with a hard disk installation. Kicking off OpenOffice.org for example takes around 40 seconds from the SimplyMepis CD. From hard disk it takes less than half that time. So let's commit to installing on the hard drive. Before you begin, boot Windows and defragment the drive, if you have used Windows some on the PC. Also backup any important files, if you stored any important ones on the PC. So how do you install SimplyMepis locally?
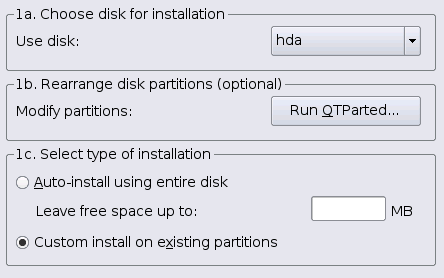
Start by clicking the Install Me icon on the desktop You get this prompt window. |
|
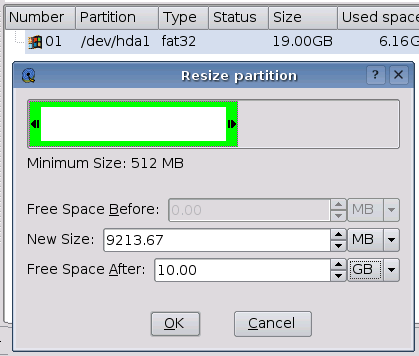
Linux identifies disk drives by letter, starting, logically enough, with "a". The Use Disk drop-down list will show all available hard disk drives. Unless you want to dedicate an entire drive to Linux, you'll almost certainly want to click the Run QTParted button. As its name suggests, QTParted is a partition editor. It'll show devices in their full Linux-qualified form such as /dev/hda. Select the drive you want to install to and let QTParted scan its layout. Most Windows installations occupy the entire disk so QTParted will only show one partition. That's fine, we just need to resize it to make room for Mepis. Right-click the partition, choose Resize and adjust the slider to make some room. How much space do you need? You can get away with as little as 3GB but I'd suggest at least of 5GB. 10GB is even better. |
|
At present I only have one partition, so here I'm resizing it to add 10GB of free space. Here's what the partition table looks like now... |

|
The new partition appears right away but changes aren't actually made to the drive till you click the Commit button. You can undo changes - up until you Commit them - by clicking Undo. Now right-click the new partition, choose Create and select Create As: Extended Partition. QTParted will look something like this... |

|
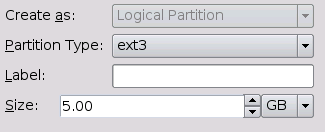
There are a number of reasons for turning the free space into an Extended partition. Due to historical reasons, disk drives (actually the Master Boot Record) need to have no more than four Primary partitions. What's more, you can sub-divide the disk into more than four areas under an Extended partition. So let's do just that. I want to create a root partition (identified by the "/" symbol), a swap partition, and a home partition (identified as "/home"). Technically, Linux only requires a '/' (root) and a swap partition, but keeping '/home' in its own area means you can upgrade the operating system without losing any of your work or settings. That makes life much, much easier! Right-click the free space line and choose Create. This 5GB area will be for our '/' partition. |
|
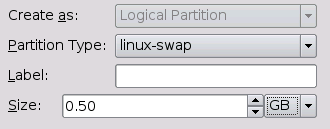
I'm allowing half a gigabyte for swap space as the machine I'm using has 1GB of RAM. As a general rule, for typical home/small-office use, set the swap space to equal your PC's RAM up to a maximum of 512MB. (Note the partition type differs for swap space.) |
|
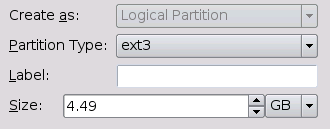
And the remaining space will become my /home drive... |
|
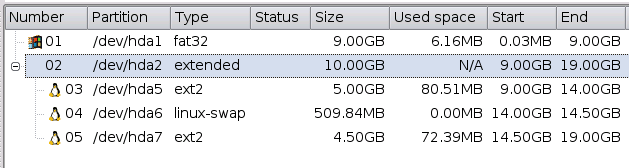
QTParted's partition table looks a bit more complicated now, yet still strangely logical... |
|
When you're happy with your new layout, click the Commit button to write it to disk then close QTParted. You'll find yourself back in the Installation Dialog 1 so click Next to proceed. |
|
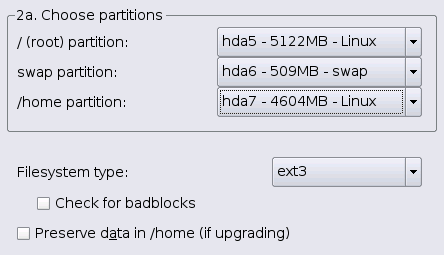
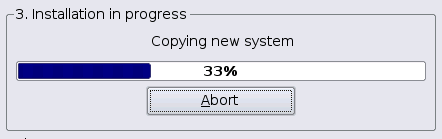
This should be pretty straightforward. Simply click the drop-down arrows and select the partitions [hdaX] you just created for each of the three partition types [root swap home]. (In reference to future upgrades of your Linux operating system, note the checkbox labelled "Preserve data in /home".) The Next button takes us to the actual Mepis installation. This will typically take between 10 and 45 minutes depending on the speed of your machine. |
|
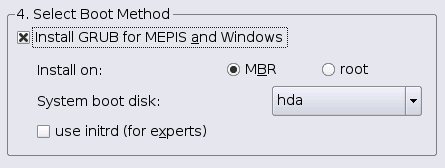
Once everything's installed. you're then prompted for where to put the boot loader. This is a clever piece of software that presents a menu, allowing you to choose whether to boot Windows or Linux. Unless you're a guru, stick with the defaults... |
|
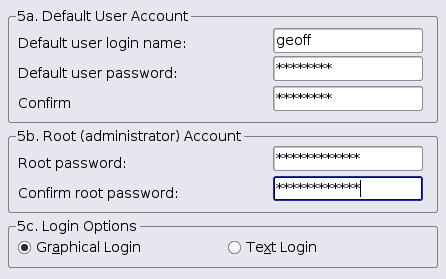
User Account (& root password): Now you're prompted to create a user account and set your own root password. (Remember when running from the CD the default user was "demo" and the root password was "root".) I suggest use more sophisticated passwords for your hard disk installation... |
|
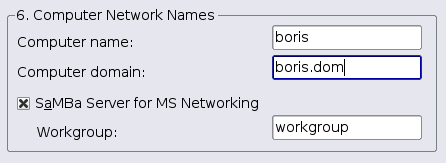
You're now prompted for a computer and a domain name. If you plan to have several Linux or Mepis machines in your house, you may find it helpful to use names like mepis1, mepis2, and so on. But, in this example, the machine Mepis is running on will be called Boris. The domain name can be anything and in most cases isn't used - unless you have a special network setup. Note that I've set the Workgroup name to "workgroup". If your PC's part of a Windows workgroup you should set the appropriate name here. (Windows machines default to a workgroup name of "workgroup".) |
|
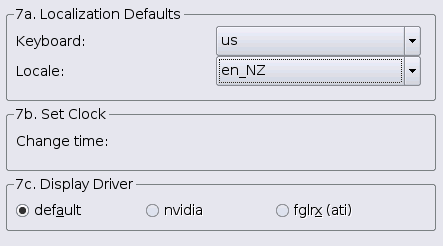
In Localization Defaults, I set the Locale to en_NZ (English/New Zealand). This informs the system that we use the "$" sign for currency, format our dates dd-mm-yyyy, and so forth. |
|
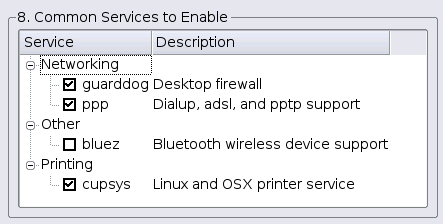
And the very last option is to choose which services to enable at boot. The defaults are shown below. (Note that you can change these once the system is up and running.) |
|
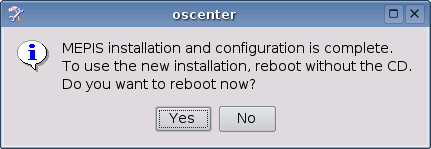
Now all that remains is to remove the installation CD and restart your PC. |
|
So reboot and try out those applications that are now installed on the hard drive. (And all their work files will be created on the hard drive now, instead of being constrained to available computer memory in Live CD sessions.) |
|
FOR MORE HARD DISK PARTITIONING INFORMATION: To find more information on disk partitioning for Linux installs (especially Ubuntu installs), you can try WEB SEARCHES on keywords such as the following. It may be helpful to do an image-search, rather than a text-search --- so that you can find web pages with screenshots of disk partitioning. You can also try Wikipedia pages like the following, and following links on those pages for even more information. |
|
Bottom of this To return to a previously visited web page location, click on the Back button of your web browser, a sufficient number of times. OR, use the History-list option of your web browser. OR ...
< Go to Top of Page, above. >
|