*Xsane* Scanning application

Usage Notes

by Blaze

Home > RefInfo menu >

Computer topics menu (Linux section) >

Linux Guides/Notes by Blaze menu >

This Xsane Scanning NotesByBlaze page

! Note !
More notes and/or images may be added
--- if/when I re-visit this page.

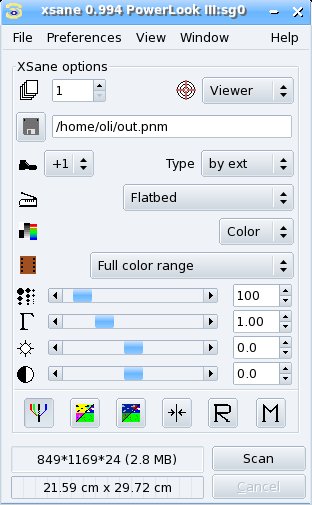
INTRODUCTION:

I have found it very useful to use the scanner on a PSC (Printer-Copier-Scanner) device to make copies of documents and of photographs that I want to preserve in digital files.

I used to use HP PSC printers at home, but I switched to using Epson PSC printers. At that time, for scanning, I learned how to install and use the Epson 'iscan' program --- the Linux version --- for use on my Linux desktop computer with an Epson NX430 printer attached.

I have described my installation and use of the Epson 'iscan' program on another RefInfo-Computer page of this site.

I have tried scanning with an HP PSC printer --- by using the Xsane GUI interface to the SANE (Scanning Access Now Easy) software, on Linux.

I am using this page to accumulate notes on using Xsane.

My notes follow. Below those notes are some 'external links' to more information on Xsane, SANE, and scanning on Linux.


Notes on using the Xsane scanning app :

Steps in scanning a letter (or photo) on Linux:

  • Open the Xsane application. (It does a scan of your system for scanner devices. In my case, it discovered a video camera and my HP PSC (Print-Scan-Copy) printer. I chose the HP device.)

  • The main Xsane window opens up. It indicates a default location for the scan file at $HOME/out.pnm. (Apparently it will make a PNM file.)

  • I clicked on the 'Scan' button at the bottom right of the Xsane window, and my HP scanner sprang to life.

  • When the scan was finished, I was given an opportunity to save the file in a different location and a different name. (I gave the file a more meaningful name and chose to save it in a $HOME/IMAGE_CAPTURE directory that I use for screen captures.)

  • If the letter (or photo) is faded, one can take the file into an image editor to do 'gamma-correction'. Unfortunately, the image editor that I usually use, 'mtpaint', does not read PNM files. So I used the ImageMagick command 'convert' to convert the file to a GIF file. Example:

    convert whatever.pnm whatever.gif

    For a photo, to capture more than 256 colors, you could use

    convert whatever.pnm whatever.jpg

    or

    convert whatever.pnm whatever.png

    A GIF file is sufficient if you are scanning black-and-white (or gray scale) documents.

  • I read the GIF file into 'mtpaint' and used the 'mtpaint' tool path

    Effects > Transform Color

    to get to the panel that has a gamma-correction slider bar. A gamma-correction of less than 1 will darken the image. I saved the file.

Voila. (Mira lo.) The GIF file is ready for use.


If I ever have more notes to add about Xsane --- its installation or its usage --- I may add them here.

EXTERNAL LINKS on 'Xsane' :

Bottom of this
'Xsane' Notes page.

To return to a previously visited web page location, click on the Back button of your web browser, a sufficient number of times. OR, use the History-list option of your web browser.
OR ...

< Go to TOP of this page, above. >

Page was created 2013 Mar 20.

Page was changed 2019 Jan 07.
(Added css and javascript to try to handle text-size for smartphones, esp. in portrait orientation. Changed some links.)